

Project Quick Facts
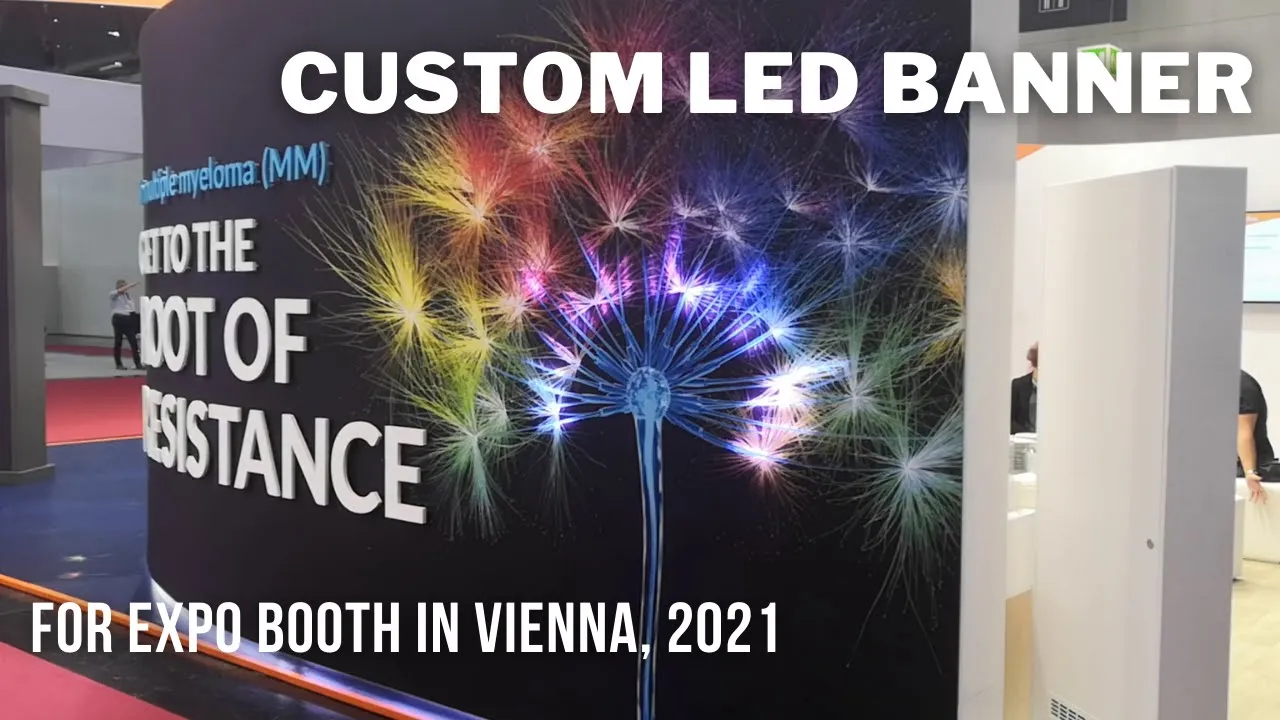
This is probably the nicest custom LED banner we have built so far. An event agency — Evka.team — reached out to us with a request to build a banner for one of their clients. The graphic was pretty complicated, made up of tens of thin lines. Each line was going to be represented by a single LED strip.
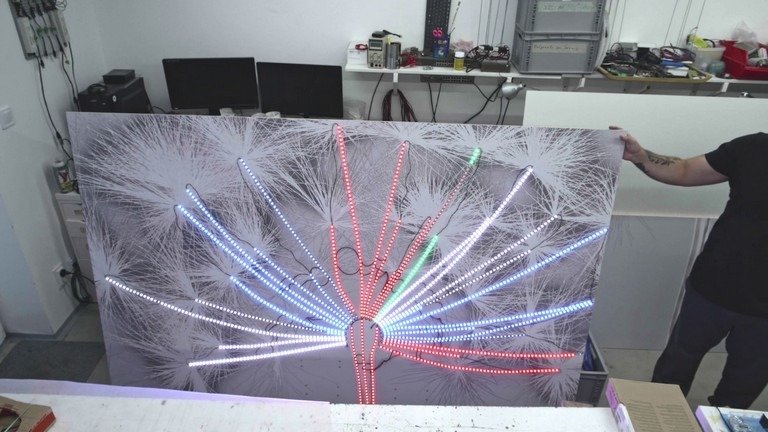
Once we saw the final printed diffuser laid over the strips, we were positively surprised with how the whole thing came together. What looked like a wall of parallel lines during construction turned into a clean, glowing piece of visual identity on the wall.
Custom LED Banner in Numbers #
To drive all 70+ segments across 4 boards, we used 2x LED Ethernet Controller 3. Because of the sheer pixel count, we went with the Pro version, which gives us 4096 RGB pixels across 4 outputs.
To our surprise, the two boards on each side were not identical. This meant we had to be extra careful during install — if we made a mapping mistake, the printed graphic on top of the diffuser would not line up correctly with the light underneath, and the whole visual effect would fall apart.
Each board also needed two 200 W power supplies to feed the strips at full brightness without any voltage drop across the runs.
Mapping and Effects #
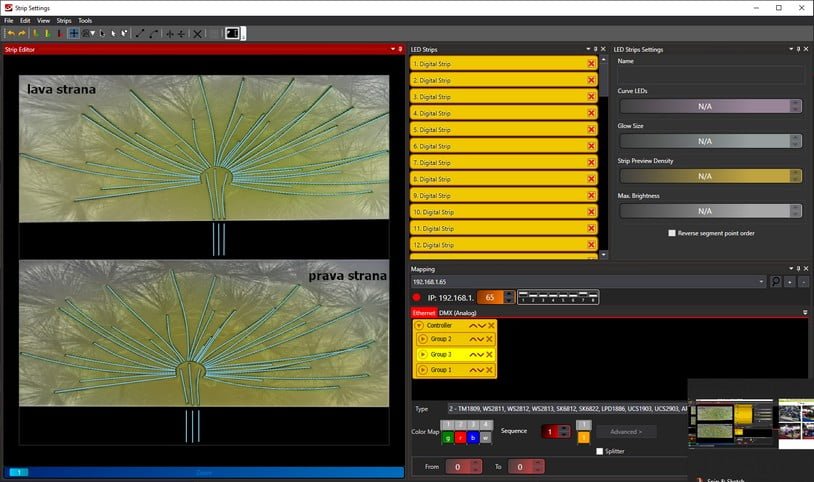
As mentioned above, this was a pretty complicated LED pixel mapping job. Luckily, in LED Strip Studio software you can upload the actual graphic as a background image and use it as a canvas to draw your segments right on top. That saves a huge amount of time on complex artwork like this one.
Since each controller has 4 available outputs, you have to organize the segments into Groups — a group is basically an output. Once you hit the pixel limit of one output, you start a new group, and so on. For a banner with 70+ segments, this planning step matters a lot.
It also helps a lot to have the object physically in front of you while you are mapping. You can double-check the signal flow, follow each strip from the controller to the last diode, and make sure every LED is doing what it should.
We prepared several effects, so the client could pick on site what they liked most :) Having a few options ready is always worth it — what looks great on a preview screen in the studio does not always feel right once the diffuser is on and the room lights are down.
Frequently Asked Questions #
What is an LED Ethernet Controller 3 (LEC3) and when should I use the Pro version?
The LEC3 is a professional Art-Net pixel controller that receives Art-Net over Ethernet and converts it into SPI signal for addressable LED strips. Each unit has 4 outputs, so it can drive four separate strip runs from one box. The Pro version supports up to 4096 RGB pixels across those 4 outputs, which is what you want when you are running dense installations like custom banners, video walls, or large facades. For smaller projects, the standard version is usually enough — but as soon as your pixel count starts climbing over 1000 per controller, the Pro is the safer choice.
How do you map a complex custom LED banner in LED Strip Studio?
The easiest way is to load the artwork itself as a background image inside LED Strip Studio software. You can then draw each segment directly on top of the graphic, following the exact position of the physical strips. Once all segments are drawn, you organize them into Groups — one group per controller output. This gives the software a full 2D map of your banner, so any effect you play back will follow the real geometry, not just a generic grid. For a job with 70+ segments spread across 4 boards, this is basically the only sane way to work.
Why do you need to split segments into Groups when using multiple outputs?
Each controller output can only handle a limited number of pixels — for the LEC3 Pro, that is 1024 RGB pixels per output, 4 outputs, 4096 total. Groups in the software match those physical outputs one to one. When you assign a segment to a group, you are telling the controller which cable it should send that data down. If you fill up one group, you start assigning the next segments to the second group, and so on. This keeps the signal flow clean and predictable, and it also makes troubleshooting much easier if one output ever stops working.
How much power do you need for a custom LED banner this size?
For this custom LED banner, each board needed two 200 W power supplies — so 400 W per board and roughly 1600 W total across the 4 boards. The exact number depends on how many pixels you have, what IC type they use, and how bright you plan to run them. A safe rule of thumb: budget for full white at full brightness even if you never plan to run it that way, because it gives you headroom and keeps voltage drop under control. Splitting power across multiple smaller PSUs, rather than one huge one, also makes cable runs shorter and heat easier to manage.
Why is a printed diffuser used on top of the LED strips?
A printed diffuser does two jobs at once. First, it softens the light from the individual LEDs so you see a smooth glowing line instead of a row of hot dots. Second, the printed graphic on the diffuser turns the raw strips into an actual branded artwork — logos, patterns, custom shapes, whatever the client needs. When both the mapping and the print are aligned properly, the effect is a clean piece of visual identity that also happens to animate. That combination is basically the whole point of building a custom LED banner instead of using a stock LED panel.
Why prepare multiple effects before an event install?
Because the client almost always wants to make the final call on site, and what looks perfect on a preview monitor in your studio can feel very different in the actual venue. Ambient light, wall color, viewing distance, and the mood of the event all change how an animation reads. Preparing 4–6 variations — different speeds, different color palettes, a calmer version and a more energetic one — takes very little extra time in LED Strip Studio and gives the client a real choice on the day. It also protects you if the first idea does not land the way everyone expected.